Sections of the site
Editor's Choice:
- Ultrasonic parts cleaning and degreasing - RUSDORF
- Breeding worms and obtaining biohumus
- Thesis: Profitability of the banking business: assessment and management
- Using reporting for risk analysis and assessment
- Inside view: a day in the life of a criminal investigation officer
- What happy and successful people always ignore
- Do you need to be happy all the time?
- All unhappy people are unhappy for one reason Feelings of happiness and joy in words
- Voronezh ufologist has published a book with personal photos of anomalous phenomena
- The most successful businessmen in the world who do not work like everyone else
Advertising
| Breeding worms in wooden boxes. Breeding worms and obtaining biohumus |
|
Common local worms collected in a forested area are suitable for breeding. In a suitable place, they dig a small hole, fill it with rotted leaves, vegetable and fruit peels (excluding garlic, potatoes, citrus fruits and onions). After that, the food is poured with water, and the hole is covered with cardboard or a board. It is possible to collect individuals settled near the feeder in a week. Where to breed wormsFor a home worm farm, you will need strong containers. Suitable for this:
The usual container for short-term storage of worms - a canvas bag, wooden or plywood boxes are not suitable for long-term use. They quickly become damp, the boxes begin to rot, the bags begin to rot. The selected container must be prepared before use. Using a drill (7-9 mm), holes are made in the bottom of the future farm, which will drain excess water. The holes should be evenly distributed throughout the bottom. A tray is needed under the container. Before placing a container on a tray, the latter must be filled with dry sand - it will absorb excess water. A layer of 3 cm will suffice. Conditions for breeding wormsThe container size is calculated based on the number of worms present. For 1 kg of individuals there should be at least 1 sq. m of surface area. Worms do not tolerate sunlight, so it is desirable that the worm nest is located in a dark place. How to fill the containerThere are different ways to fill the mini-farm. The first layer is straw or large sawdust. Its height should be about 5 cm. Biohumus is poured next (it is sold in flower shops). The height of this layer is about 10 cm. The third layer is laid food: fruit and vegetable trimmings, old tea leaves (without sugar), coffee grounds. The feed is evenly distributed over the entire surface with a layer of 5 cm. The topmost is a layer of humus. Its height is 2 cm. If ordinary soil is taken to fill the container where the worms will be bred, it must be ensured that it does not contain roots and leaves. When the leaves rot, a large amount of oxygen is consumed. What to feed the wormsAlmost all waste can be used as feed. The exceptions are potato peelings, citrus fruits, onions and garlic. Do not use salty food, meat or fish for feeding. Worms' favorite food is oatmeal. You can also give them dry oats, but it should be borne in mind that dry flakes take moisture from the soil. How often to water wormsWatering the worm should be plentiful. Excess moisture will drain through the drainage holes. Watering is done at every feeding. If the room temperature is high, water more often. You can check the quality of soil moisture in a simple way - squeeze a handful of the top layer in your fist. If water seeps through the fingers, there is enough moisture. Water should be settled (at least 3 days), room temperature. Breeding worms is a simple process. Compliance with simple rules will allow you to avoid typical mistakes and get a really working home worm farm. Breeding a worm at home. Breeding the Prospector worm in boxes. Obtaining biohumus, vermichaya. How do worms reproduce at home? Photo. Each of us has been familiar with worms since childhood. Those who are disgusted by it simply do not know what kind of "beast" it is. The earthworm is a great soil worker. Breeding worms at home, you can use kitchen waste to get biohumus and vermicai of excellent quality, and use them when growing seedlings and in the garden. Breeding earthworms at home.It is possible to breed earthworms at home, but it is not at all cost-effective. The earthworm breeds slowly, is picky in food, lives a little. Of course, you can work hard and in a few generations breed your own breed from an ordinary earthworm, but I didn’t. Russian professor Igonin Anatoly Mikhailovich managed to breed a special breed of earthworm and called it "Prospector". This worm, unlike the usual earthworm, lives longer, tolerates a change in the type of food, multiplies rapidly - it is fully adapted to human needs. Having rummaged through the Internet on forums and shops, I found boxes suitable for me. They do not have extra holes, are strong and are conveniently inserted into each other. Dimensions 590x360x180mm (My first boxes were smaller, but I was uncomfortable with them.) If you choose very large boxes filled with biohumus, they will be too heavy. The minimum set is three boxes. Boxes for breeding a worm at home. Holes are made in two with a drill (bottom and all sides along the upper edge - see photo). 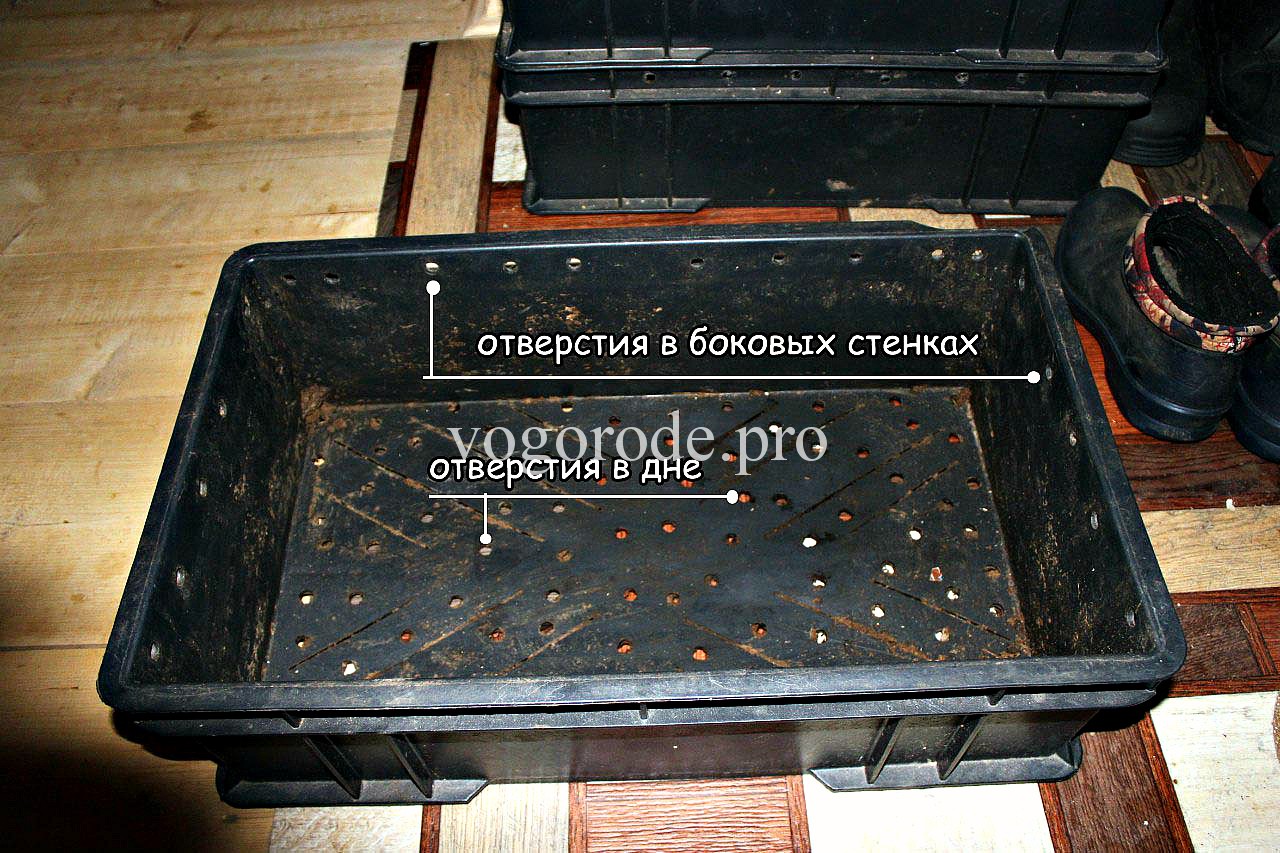 Top drawers for keeping worms. Top drawers for keeping worms. Holes are made in the lower box only in all sides along the upper edge in one row for ventilation, vermichay will drain into this box. The number of holes depends on the size of the boxes - so that it does not lose strength. We put one perforated box on the box for vermicai. We put food in it and populate the worms in the amount of approximately 1500 - 3000 pieces. Close the lid - the worm loves the dark. Care for worms "Prospector" at home.When the worm eats a layer of food in the box (this will be easily noticeable, the top layer will take on a flat, loose surface), lay the next 5 cm layer, and so on. 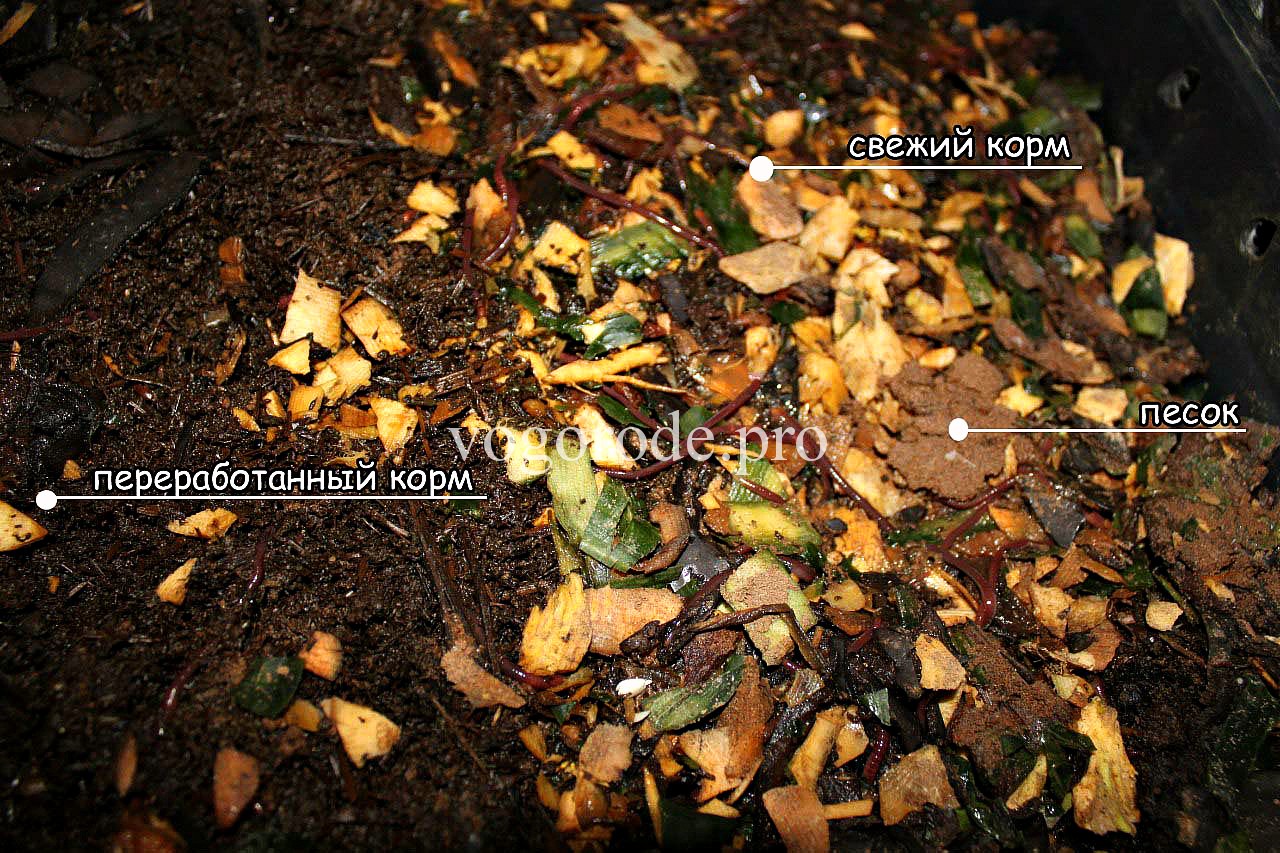 Breeding worms at home. Put food for the worms. Breeding worms at home. Put food for the worms. When the box is full, we put the second one on top, which also has a perforated bottom and sides, into which food is poured, and the worm from the first (lower) box, through the holes, crawls itself into the second (upper) to fresh food (in the lower box, all the food is processed and nothing to eat). At each new feeding, I powder on top with a thin layer of sand and a little ash (which has settled for a month), or chalk. Sand helps worms digest food, and ash serves to deoxidize and saturate biohumus with additional trace elements. For better, faster processing of food, I spill each new feed tab with undiluted vermicelli. When the second box is filled to the top, then we put the third one on top and the worm, in the same way, crawls there through the holes. I always close the top drawer with a lid - the worm does not like light. Thus, up to 5 floors can be placed. The optimum temperature for the maximum activity of the worm is 20° - 25°C. At negative temperatures, it hibernates (it can winter outside in a compost heap). Worms live only in organics and will not run away from the box anywhere. Obtaining biohumus.When, for example, all three boxes were filled with biohumus and the free boxes ran out, I remove the bottom box with biohumus, free it from biohumus and put it on top of the last one, pour in new food, spill it with vermicompost and close the lid. The worms themselves will crawl into it. 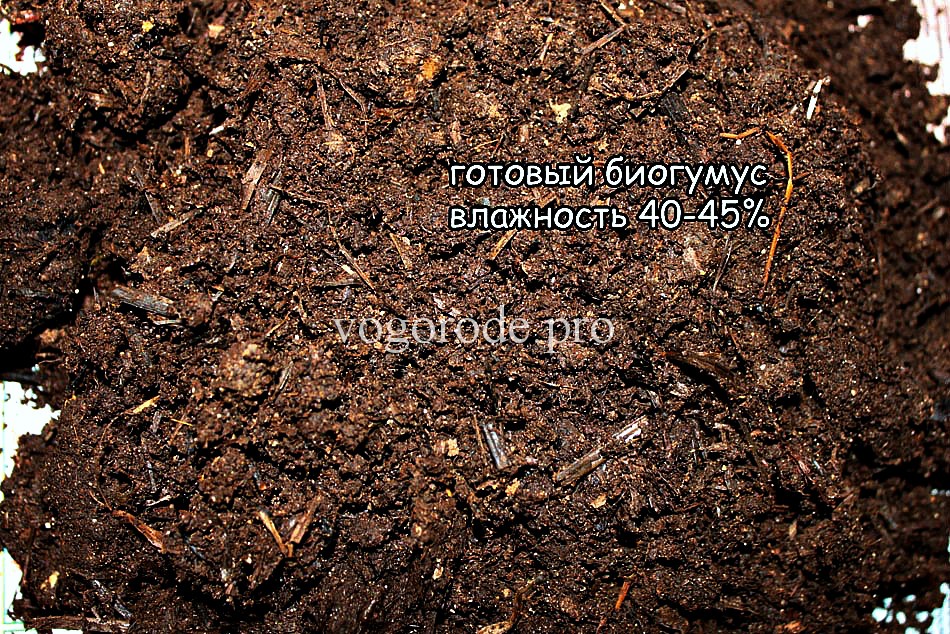 Breeding worms at home. Ready biohumus. Breeding worms at home. Ready biohumus. Ready still raw (raw) biohumus, I spread it in a woven plastic bag, or in a simple wooden box for subsequent fermentation, readiness. Ready vermicompost acquires a loose form. Almost always, some of the worms still remain in the lower box filled with biohumus. You can simply collect them with your hands, you can leave them in biohumus. How to feed worms when breeding at home?Everyone who gets worms adapts them to their available food. But first I recommend asking the seller what the worms ate from him and gradually bring in your food as they are eaten. Worms love a lot of our kitchen waste (this can be a variety of vegetable waste: peels from fruits and vegetables, leftover tea leaves, etc.). If the food lies for several days and begins to sour, then they obviously did not like it and it is better to remove it. To speed up the process of eating food, I chop it in a wooden trough. But you can also use a meat grinder or just cut with scissors or a knife. I like to grind in a trough, because I don’t have to wash a bunch of meat grinder parts every time and any waste is easily placed in the trough. If you put the waste without grinding, then they are processed longer and may even rot. Sometimes I sprinkle sunflower husks, for looseness of the substrate, so that biohumus does not turn sour (just in case 😊)
Breeding worms at home. How do worms reproduce?If the worm lives happily and eats well, then sooner or later it begins to multiply. It lays cocoons - small sand-colored balls. They can be easily spotted.  Reproduction of worms. The worm lays cocoons - small sand-colored balls. Reproduction of worms. The worm lays cocoons - small sand-colored balls. There are several eggs in each cocoon, and after 2-3 weeks new worms hatch. And after another 7-12 weeks, these worms are already able to bear offspring. Over time, you understand how your pets live, whether they are dry or damp, when they need to be watered or fed. In any business there are always mistakes and discoveries, and it is impossible to give clear instructions. Each person has their own type of food for the worm, and the temperature of the room. We must be attentive to these little helpers of ours. When breeding a worm at home, we get biohumus and vermicai.Worms create a wonderful vermicompost from a heap of organic matter, with a special pleasant smell familiar to every gardener. The same magical biohumus that our seedlings and plants in the garden are happy with. The worm, in which colonies of microorganisms live, moves in the soil, processing organic matter. It secretes coprolites (kopros - a bowel movement, lithos - a stone) with a large amount of its own intestinal microflora, enzymes, vitamins, biologically active substances. They have antibiotic properties and prevent the development of pathogenic (morbid) microflora, putrefactive processes, the release of fetid gases, disinfect the soil and give it that very pleasant smell of the earth. I will talk about the use of biohumus for growing seedlings later. Vermichay is an aqueous extract from biohumus. It is commonly referred to as vermicompost tea or simply vermicai. It is similar in color to ordinary strongly brewed black tea with a slight aroma of soil. Vermicai is a great tonic for all plants from indoor flowers to fruit trees. It nourishes, protects against stress and pests, prevents diseases, develops a strong root system and helps to quickly adapt after transplantation. Getting vermicha.There are different ways to get vermicai - an aqueous extract from biohumus. I chose the right one for me. Once every two weeks, with water, from a watering can for indoor plants, I spill the top box. Water gradually passes through all the boxes. From the calculation: two liters of water per box. The thicker the layer and the more boxes, the richer the tea. The next day, I pour the tea into bottles and store it in a dark, cool place. 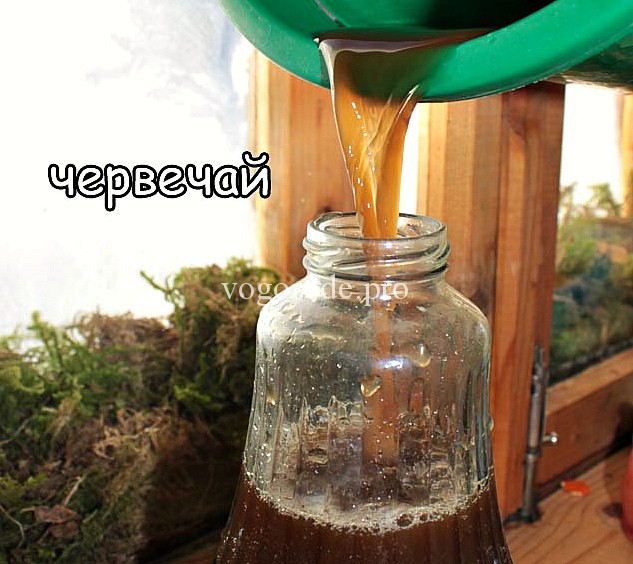 Most often, I use the vermicai collected during the winter in the spring in the garden. Most often, I use the vermicai collected during the winter in the spring in the garden. I dilute tea with water in a ratio of 1:10 or in its pure form. I know that some use it for indoor plants, but I do not practice it myself.  In the summer I keep worms in a bath in the garden and collect vermichai in buckets and water (1:10) the whole garden. In the summer I keep worms in a bath in the garden and collect vermichai in buckets and water (1:10) the whole garden. I will talk about this in the next article. You can read about purchased vermicompost and Wemicoff - ©Alexey Lesnykh (2017) I will answer your questions in the comments. In fishing, different baits can be used - both artificial and live. But of particular interest to many species of fish is the dung worm. In general, fishing worms are a universal bait, although it is not always possible to buy them. True, they can be accumulated, but only under certain conditions. In the event of a drought in the summer, it is difficult to find a worm, not to mention winter fishing. Therefore, breeding worms for fishing at home can be a suitable choice for fishermen. Worms loosen the soil What are the benefits of wormsIt is difficult to overestimate the importance of worms. First of all, it should be noted their importance for increasing soil productivity. Consider the functions that they perform as part of this task:
Worms can also be excellent bird food. This is of interest to:
 Worms create fertile soil Worms create fertile soil
In appearance, they are difficult to distinguish from ordinary red worms. The difference is only in a slightly longer length and an unpleasant odor from the yellowish liquid that is released when the worm is baited. They also differ in terms of content. Technology for growing worms at homeThe question of how to breed worms for fishing involves preparing all the necessary conditions for their home maintenance. It would seem that this can lead to unsanitary conditions in the house. But if you correctly approach the choice of place and container, as well as correctly feed the worms in order to prevent the appearance of unpleasant odors, then there will be no inconvenience from such a neighborhood. Worm boxGrowing worms for fishing requires a certain container, which is suitable for a plastic, wooden or even cardboard box. If you are running your mini-farm for a long time, i.e. it is expected to breed a large number of worms for a long time, then choose a plastic box. It is easier to wash and clean, and also more durable. If you plan to temporarily grow a small number of individuals, cardboard or wooden boxes are suitable. But you need to understand that the cardboard box will often have to be changed or inserted into another of the same, as it will quickly get wet and lose its shape. In no case should metal containers be used, since the metal can, during oxidation, release elements harmful to worms into the soil.  Growing worms in a box Growing worms in a box The dimensions of the box can be arbitrary, but the main requirements must be observed:
You also need to remember to make holes in the box: in the bottom - for drainage, and in the sides - for air circulation. The more holes there are, the better. Holes must be placed evenly over the entire area of the bottom. The size of the holes should be small so that even young individuals cannot get out through them and crawl around the apartment. It is better to install the box on a pallet with sand. Thus, excess moisture will be absorbed, and not leak onto the floor or rack.
PrimingIt is recommended to cover the bottom of the prepared container with a small layer (about 5–6 cm) of compacted straw or hay. From above you need to evenly pour a ten-centimeter layer of biohumus. If you do not want to buy biohumus, you can prepare a suitable substrate yourself. It should include chopped straw and hay, as well as sawdust, manure and earth. All components must be thoroughly mixed and pressed.  Ground for the worm Ground for the worm When collecting soil for the substrate, it is necessary that the remains of the ash from the fire do not get into it, because this can be detrimental to pets. The presence of fresh humus in the ground will also have a bad effect on the worms. After all, the leaves and roots at high temperatures will rot, and at the same time oxygen is taken from the soil. With a lack of oxygen, worms will not be able not only to develop and multiply, but also to survive. » Worms The soil, as you know, is the foundation of all living and developing on our planet, the basis of life. In order for its strength not to run out, soil fertility must be constantly restored, and the most important workers in this direction are earthworms. Everything ingenious is exceptionally simple - the quality of land, their fertility and high crop yields directly depend on the waste product of an ordinary earthworm. How to breed it at home, how and what to feed and what care to carry out will be described further. Breeding worms at home is not at all difficult. And it can become a very serious business, and there are at least two good reasons for this:
In addition, in pharmacology, these animal organisms are also used to make medicines. The use of biohumus in personal household plots and in the household will significantly increase the egg production of poultry, soil fertility, increase the yield of vegetables and fruits without the use of chemical fertilizers.  Varieties of annelidsThe most common common representative of bristle annelids is the earthworm. But it is they, freely found in nature, that are least suitable for reproduction in artificial conditions. Representatives of this subspecies breed rather slowly, hardly adapt to new conditions and unfamiliar food, and live relatively little. They, perhaps, are suitable only for breeding for their own needs of a personal household plot. For industrial breeding and production of biohumus, a Russian scientist, Professor Igonin A. M. brought out a special breed "Prospector". By crossing different breeds of species living at a sufficient distance from each other, he was able to obtain individuals with completely new qualities:
Prospectors adapt as quickly as possible to the conditions of artificial reproduction and give an excellent increase in biomass and humus. Another variety that meets the requirements of industrial production is the red California worm. Individuals of KKCh also reproduce very quickly, increase their useful mass, process various organic waste products of human life into biohumus, and serve as excellent protein feed for agricultural and fish farms.  The prospector worm is the fastest breeding individual. For 1 year it can bring offspring in 1500 worms The prospector worm is the fastest breeding individual. For 1 year it can bring offspring in 1500 worms Breeding technology in householdsNecessary equipment and place for breedingIf you decide to start breeding worms, you first need to carry out preparatory work - choose and prepare a place or container. Wooden, plastic or cardboard boxes can serve as containers (it is clear that cardboard containers will have to be changed often), collars. They are placed in a shed, garage, or any other place specially designated for this, where it is possible to meet the necessary conditions - the moisture content of the substrate is at least 70-80% and the temperature is from 12-15 ° C to 22-24 ° C. You can breed worms in normal compost heap, pit.  One convenient option is to use two or three perforated drawers stacked on top of each other. The lowest - with holes around the perimeter at the top of the sides. This box is designed for vermicai - the liquid component of biohumus. A box with perforated walls and a bottom is placed on top of it, a nutrient medium for worms is laid in it and individuals are settled, on top of the boxes you need to cover with burlap or other “breathable” fabric, since creeping ones love dark and damp places. Making a wormYou can breed individuals on the street, right in the garden, separating a certain place for this and enclosing it with boards or other improvised material. Approximate dimensions of the worm: width 1-1.2m, height 30-40cm, arbitrary length. Compost is laid on the bottom in a thick layer, leveled and well moistened. Then, for 5-7 days, the compost heap must be covered with an air-permeable material. It can be old burlap, cardboard, a layer of straw, which need to be watered from time to time with rain or well-settled water (at least 2-3 days). Chlorine must completely evaporate, since for worms of any kind it is poison. After a week on each sq. m, a recess is made in which the creeps are placed, and again the worm is covered with a breathable material.  Compost preparationAs compost for laying in boxes or pits, you can use mixtures of rotted manure, bird droppings, peat, straw, leaves and stems of vegetable crops and weeds, crushed eggshells and food waste. In no case should fresh manure be used, it contains a large amount of ammonia and individuals die. The rotted manure of 2-3 years ago will also be of little use, since it already lacks useful nutrients. All organic materials suitable for breeding are collected on a pile (or in a specially designated place), covered and, periodically moistened, kept for 1.5-2 months.  Own vermifarmIf you decide to get your own small worm farm, then, first of all, you need to equip a place for keeping worms, stock up on containers, prepare compost and provide comfortable conditions for breeding. The purchase of breeding stock is of decisive importance. The most suitable species, as already mentioned, are Californian red worms or prospectors. One family is 1500 individuals. In order to populate 1 cube. m of compost requires 1-3 families of breeding stock. Settling in a new place must be done with great care. First, a few individuals are launched into a small amount of prepared soil in a separate container, the soil is leveled and the container is closed. After a couple of days, you need to add a little food. If all the worms are active, mobile, with a characteristic red color, the entire population can be settled. If dead individuals are found, then it is necessary to correct the acidity of the soil (the most favorable is the environment with an acid index of 6.5-7.5 pH).  How to feed earthwormsEarthworms are real vegetarians and they cannot tolerate protein foods: meat, fish, eggs. When buying a breeding stock, it is necessary to find out what the seller fed his wards, since the most familiar is the food that they have tried “from birth”. However, they quickly get used to new foods, especially Prospectors. It takes some time to get used to a certain type of feed, so new components should be introduced into the feed base gradually, allowing the worms to adapt. Plant residues, potato peelings, cabbage leaves, various food waste from the kitchen of plant origin, tea and coffee grounds, straw, grass, dry bread are suitable as top dressing. Only whatever you add to the compost heap needs to be shredded for easier and faster processing by the creepers. Otherwise, the process of acidification, fermentation or rotting of products may begin. You need to feed every 2-3 weeks. Sprinkle top dressing on the entire surface of boxes or piles, evenly, 7-10 cm thick, until the thickness of the processed humus reaches 50-60 cm and the substrate takes the form of a uniformly processed biomass. The approximate cycle time is 3-4 months from the time the livestock is settled.  Feed the worms every 2-3 weeks Feed the worms every 2-3 weeks Care and reproductionThe main care on worm farms or worms is to observe the temperature regime, timely feeding, and maintaining the humidity level when watering with warm rain or settled water. Being in favorable conditions, the worms begin to multiply. In the compost, they lay cocoons - small balls of yellow-sand color. Each of the cocoons contains several eggs, from which small worms appear 2-3 weeks later, and after another 7-8 weeks they themselves are ready to produce offspring. Prospectors are the unsurpassed leaders in terms of reproduction rate - one individual produces offspring of 1500 individuals per year. Possible marketsRaising worms can really become a profitable business if you take care of the market for processed products and increased livestock in advance.
 Profitability of productionAccording to the calculations of farmers involved in the cultivation of earthworms, the profitability of the vermi farm is within 150%. One Prospector per year gives offspring of 1500 individuals and about 100 kg of the most valuable fertilizer - biohumus. From 1 ton of harvested compost, you can get up to 600 kg of high-quality fertilizer and 10-15 kg of new individuals. Farms for growing worms and producing biohumus are not only cost-effective and profitable farming, but also enrichment of the environment with useful substances, the possibility of obtaining environmentally friendly food products.
In fishing, both artificial and natural types of baits are used. Regardless of the season and fishing method, the worm is not inferior to artificial bait. It is not always possible to buy the necessary worm in the store, and the price of such a purchase can be too high. Breeding worms at home is not a very difficult task, it is enough to have the necessary information. Rules and features of breedingVarieties and characteristics of worms: The most popular in the field of worm breeding is the "prospector". This is a representative of one of the species of Californian red worms. It differs from its counterparts in a high level of productivity and fertility. He has a well-developed instinct for self-preservation. At low temperatures, the "prospector" burrows to a safe depth. The breeding temperature range is from +8 to +29 °C. An adult is capable of producing about 1,500 worms per year. The worm is unpretentious in food, quickly gets used to a different type of food. Resistant to many types of diseases.
The California red worm is easy to grow at home. He is less prolific than his fellows. On average, 400 new individuals appear per year. An adult worm reaches 8 cm in length, with a weight of 1 g. Like the "prospector", the main advantage is the speed of biomass production. The resulting biohumus has saturated enzymes, the maximum amount of microelements and active substances. Comfortable conditions for the successful life of the red worm will be a temperature of 15-25 degrees and a relative humidity of the habitat of 60%. In such conditions, he is able to live for about 16 years. The disadvantages of the Californian worm include pickiness in the choice of food, increased thermophilicity and the negative impact of direct sunlight.
The advantage of common earthworms is their good adaptation to the environment. This type of worm is considered a universal bait - more than a dozen different types of fish bite perfectly on it. The length of the grown worm reaches 15-30 cm, specimens that have reached 40 cm are often found. The main disadvantages are low life expectancy (up to 4 years), passivity in reproduction. Despite the shortcomings, earthworms are unpretentious in nutrition and have a fairly active growth.
The flour worm is the larva of the beetle. It tolerates temperature extremes and has a high reproduction rate at home. For development, a comfortable temperature is considered to be 28 degrees, while the humidity should not fall below 50%. In the choice of food, they are not whimsical.
This worm is a favorite delicacy of many fish. The yellow liquid inside it has a specific smell that drives the fish crazy. These worms are similar in appearance to red ones. The difference lies in the conditions of detention. To create a habitat, you need: sawdust, manure, rotten hay or straw, black soil, wet leaves. All this is mixed and well pressed. The greater the soil pressure, the more comfortable the worms live there. They have no preferences for temperature and high humidity.
In the selection, there are also specially bred worms for fishing - This type of worm breeds sluggishly, but it has a very fleshy body structure. Care on them has certain difficulties associated with the constant maintenance of increased optimal living conditions.
Worms feedingWorms feed on rotten or dead plant remains. In their diet, it is recommended to add potato peels, stale bread, cabbage leaves, banana skin, kefir diluted with water, grass, rotting straw, the remains of the thick of used tea or coffee, chicken droppings, manure, boiled vegetables. It is forbidden to add the following ingredients to the food of worms:
Before serving food, it is well ground in a meat grinder. The composition of the feed must be constant. When changing nutrition, individuals must undergo adaptation for several weeks. Putting a new serving of food is necessary 2-3 times a month. It all depends on the temperature regime - the warmer, the more often and more worms eat food. Remember, too much food will ferment the soil, making it more acidic.
Worms for breedingWorms are more often purchased at pet stores, the Internet, and fishing stores. When making a purchase, you should pay special attention to their appearance and general condition. They must be active and solid color.
Settlement technology and rules for caring for worms
You can breed worms not only in the village or in the country. Any place without noise and excess vibration is suitable for this: in an apartment on a balcony or a “dark” room, in a garage, in a garden or other utility room. The main condition is the observance of the optimal temperature regime and sufficient humidity (70%). Unpleasant odors can be avoided by sprinkling the feed with earth or biohumus. To breed worms at home, you need to buy a vermicomposter or make a worm hive with your own hands. This design is a plastic or wooden box (box), about 40cm high. Breeding containers must have ventilation holes. Holes are drilled in the top of the box or lid. The structure is installed at a slight slope so that through a hole drilled in the bottom to drain the worms formed during the life of the worms. An old refrigerator can act as a worm. It is placed with the doors up, pre-drilling holes. If there is no desire to make a worm, you can purchase a ready-made special product for growing worms - a vermicomposter. It is made in the form of two plastic boxes, installed one on top of the other. Both have holes for ventilation and special slots at the bottom. A tap is mounted in the lower drawer, located on legs. It is used to drain the resulting vermicai. After preparing the soil mixture, for 2-3 days a deepening is made in it and the first tenants are settled in the wormhole. After evenly distribute the soil and cover with a lid. Feed is added two days after settlement. To know the required level of soil acidity, we make a trial settlement in a smaller container. For breeding worms, the optimal acidity of the soil sweep will fluctuate in the range of 6.6-7.7 pH. With more acidity, the worms begin to die. Reduce its level by adding eggshells, chalk or limestone to the soil. To increase the acidity, sawdust, straw or plant remains are used. If within a week the surface of the substrate is clean, and the worms are actively mobile, then the colonization was successful.
Worms are fed every 1.5-2 weeks. The food is applied evenly to the entire surface of the box with a thickness of 5-7 cm. Under favorable conditions, the worms multiply very quickly, so it is necessary to have pre-prepared worm nests for relocation. Monitor humidity constantly. The watering procedure is carried out with warm (room temperature +24 ° C) water, using a watering can with small holes. With a substrate layer of more than 20 cm, loosening is necessary to enrich the soil with oxygen. Mixing is carried out with a special fork or other tool with rounded ends. This procedure should be carried out twice a week. As a result of the activity of the worms, the soil, which is located in the box, is divided into three zones. The top layer contains nutrients. The layer in the middle is used by adults for housing. All the products of their active processing are collected in the lower layer, which is why it is so important. This layer grows over time. After 3-4 months, the worms are transplanted into a new container, along with a small part of the substrate of the lower layer. And the process starts all over again.
Reproduction of wormsA new generation of worms emerge from cocoons. One female can lay only one cocoon per week. A month later, newborn worms appear. An average of 20 worms hatch from a cocoon. In two months, they grow to the size of an adult. During the year, the worm lays up to 24 cocoons. During the growth period, the worms actively feed, so you will have to feed more often. Comfortable conditions for reproduction: temperature in the range from +20 to +24 degrees, humidity 70%. It is desirable to keep different types of worms in separate boxes.
|

 Having prepared the soil, worms can be populated in the container
  Worm food


Popular:
Don't do good, you won't get evil?
|
New
- General Porter Strategies
- Donations at work. When a colleague is a sneak. Nagging colleagues at work: what to do
- Presentation on the topic "Leasing operations What is important for a client when leasing ppt
- Presentation "I choose my future" presentation for a lesson on the topic
- Presentation - communication on the Internet
- presentation for a lesson in geometry (grade 9) on the topic
- Presentation Mercy and Compassion
- What is creativity My people will accept such a song
- Presentation on MHK order system of ancient Greece Order of the system of other Greece presentation
- Law on LLC with the latest amendments


